
In this blog post, we will explore how to create a scheduled .NET job on Google Cloud Platform (GCP) using Cloud Run.
Scheduled jobs in the cloud are ideal for data processing, system maintenance, sending notifications, and running batch jobs. With Cloud Scheduler and Cloud Run, you can create a serverless architecture for scheduled jobs, that frees you from infrastructure management and lets you focus on coding using your favorite .NET version.
We will explore two approaches for scheduling tasks on Google Cloud Run - using Cloud Run jobs and Cloud Run services. We will explain the main differences between these two options and provide a hands-on example of deploying a .NET application and scheduling it with Cloud Scheduler.
Introduction to Cloud Run
Cloud Run is a managed compute platform that allows you to run containers directly on Google’s scalable infrastructure. You can deploy code written in any programming language on Cloud Run if you can build a container image from it.
On Cloud Run, your code can either run continuously as a service or as a job. Both services and jobs run in the same environment and can use the same integrations with other services on Google Cloud.
Cloud Run Services
Cloud Run services enable you to execute code that responds to web requests or events. By leveraging Cloud Run, you can easily set up a secure HTTPS endpoint for your application, without worrying about infrastructure management. Your only responsibility is to ensure that your code is configured to listen to a TCP port and able to handle HTTP requests.
Key features of Cloud Run services include:
- Unique HTTPS endpoint for every service
- Fast request-based auto-scaling
- Built-in traffic management
- Private and public services
- Maximum request timeout of 60 minutes
Cloud Run Jobs
Unlike a Cloud Run service, a Cloud Run job only runs some code and exits when finished. Cloud Run jobs are a better fit for containers that run to completion and don’t serve requests.
Key features of Cloud Run jobs include:
- Ability to run long-running jobs
- Execution as a one-off, on a schedule, or as part of a workflow
- Maximum execution timeout of 24 hours per job
Choosing Between Cloud Run Services and Jobs
While both Cloud Run services and jobs allow you to run your code on Cloud Run, they are designed for different use cases.
- Cloud Run services are a good fit for containers that run indefinitely, listening for HTTP requests (web applications, web APIs, microservices, etc.).
- Cloud Run jobs are a better fit for containers that run to completion and don’t serve requests, or for operations that require a long time to complete (batch jobs, data processing, database backups, etc.).
Depending on which approach you choose, you will need to build a different type of .NET application:
- With Cloud Run services, the application needs to listen for HTTP requests on some endpoint. For example, you can use an ASP.NET web API application (controller-based or minimal APIs).
- With Cloud Run jobs, the application only needs to run some code and exit, without listening for HTTP requests. For example, you can use a console application.
The approach you choose will depend on your specific use case.
Architecture
In this solution, Cloud Scheduler is used to create the schedule. Cloud Scheduler is a fully managed enterprise-grade cron job scheduler that allows you to automate the execution of tasks on a schedule.
At the specified intervals, Cloud Scheduler will invoke the actual .NET job, which will be deployed as a serverless container using Cloud Run. Thus, Cloud Scheduler sets the timing for the tasks, while Cloud Run acts as the performer.
The .NET code will be built using Cloud Build, and the generated image will be stored in Artifact Registry. The image will then be deployed to Cloud Run.
The diagram below summarizes the architecture of a scheduled .NET job on GCP using Cloud Run:

Prerequisites
The following sections will walk you through the creation of a sample scheduled .NET job on GCP using Cloud Run.
Before we begin, ensure that you have the following installed on your machine:
You can also use the Google Cloud Shell to run the commands and develop the application.
Creating a Scheduled .NET Job with Cloud Run Jobs
In this section, we will guide you through the steps to create a scheduled .NET job on GCP using Cloud Run jobs.
The job used in this example is a simple .NET application that logs the current time when it is run.
The same approach can be used to schedule a variety of jobs, such as data processing and database backups, among others.
Creating a .NET Console Application
Let’s start by creating a .NET application that will represent the job we need to run on GCP.
Because we are using Cloud Run jobs, the application does not need to listen for HTTP requests. Instead, it only needs to run some code and exit. For this reason, it will be sufficient to create a simple console application.
To create a new console application, open a terminal and run the following command (replace the [PROJECT_NAME] placeholder with the name of your project):
dotnet new console -o [PROJECT_NAME]Navigate to the newly created directory:
cd [PROJECT_NAME]Replace the contents of Program.cs with the following code:
Console.WriteLine($"Job executed at {DateTime.UtcNow}");To test the application, run the following command:
dotnet runYou should see an output similar to the following:
Job executed at 11/11/2023 14:14:11Building the Container Image
Now that we have created our .NET application, we need to build a container image from it. You are not required to write a Dockerfile to build a container image from a .NET application. Instead, you can use the gcloud command-line tool to build the image directly from the source code.
First, create an artifact registry repository to store the container image (replacing the [REPOSITORY_NAME] and [REGION] placeholders with the desired values):
gcloud artifacts repositories create [REPOSITORY_NAME] \
    --repository-format=docker \
    --location=[REGION]
Enable the required APIs if prompted.
Then, submit the build using the following command (again replacing the placeholders with your values; [PROJECT_ID] is the ID of your GCP project):
gcloud builds submit --pack \
    image=[REGION]-docker.pkg.dev/[PROJECT_ID]/[REPOSITORY_NAME]/[IMAGE_NAME],env="GOOGLE_ASP_NET_CORE_VERSION=7.0.0"
This command will build the container image and push it to the specified repository in Artifact Registry.
Deploying the Container Image to Cloud Run Jobs
To deploy the container image and create a new Cloud Run job, use the following command (replacing the placeholders with your values):
gcloud run jobs create [JOB_NAME] \
    --region=[REGION] \
    --image=[REGION]-docker.pkg.dev/[PROJECT_ID]/[REPOSITORY_NAME]/[IMAGE_NAME]
Note: you can choose to assign a specific service account to the job to restrict its permissions.
Once the job is created, you can test it by manually triggering it using the following command:
gcloud run jobs execute [JOB_NAME] \
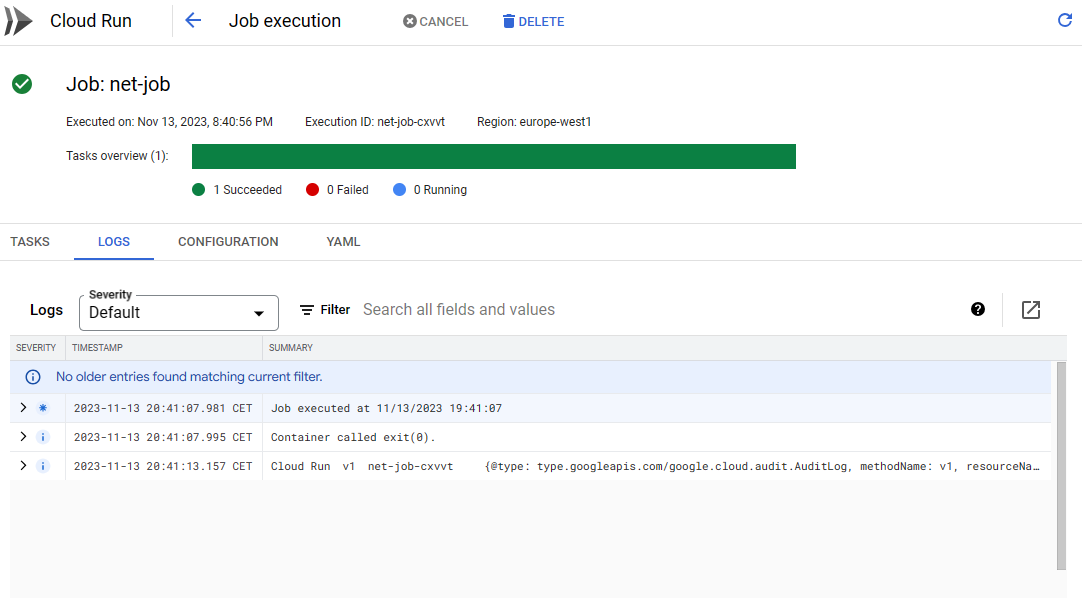
--region=[REGION]From the Cloud Console you can review the logs of the job to confirm that it ran successfully.
Scheduling the Job with Cloud Scheduler
To schedule the Cloud Run job you need to configure a Cloud Scheduler job.
The Cloud Scheduler job needs the Cloud Run Invoker role to be able to start the execution on Cloud Run. For this, you need to create a service account and assign the Cloud Run Invoker role to it.
To create a service account, run the following command:
gcloud iam service-accounts create [SERVICE_ACCOUNT_ID] \
    --display-name "[DISPLAY_NAME]"
Add the Cloud Run Invoker role to the service account:
gcloud run jobs add-iam-policy-binding [JOB_NAME] \
    --region [REGION] \
    --member "serviceAccount:[SERVICE_ACCOUNT_ID]@[PROJECT_ID].iam.gserviceaccount.com" \
    --role "roles/run.invoker"
Finally, create a Cloud Scheduler job that invokes the Cloud Run at the desired schedule. To create the job, run the following command (replacing the placeholders with your values):
gcloud scheduler jobs create http [SCHEDULED_JOB_NAME] \
    --location [REGION] \
    --schedule "[SCHEDULE]" \
    --uri "https://[REGION]-run.googleapis.com/apis/run.googleapis.com/v1/namespaces/[PROJECT_ID]/jobs/[JOB_NAME]:run" \
    --http-method POST \
    --oauth-service-account-email [SERVICE_ACCOUNT_ID]@[PROJECT_ID].iam.gserviceaccount.com
The [SCHEDULE] placeholder should be replaced with the desired schedule, expressed in cron format. For instance, to schedule the job to run every hour set the schedule to 0 * * * *.
Notice that, even though the application is not an HTTP server, we are still sending an HTTP request to a specific endpoint to trigger the job. This needs to be an empty POST request, that uses the service account we created earlier to authenticate.
This concludes the setup of the scheduled .NET job on GCP using Cloud Run jobs. Now you only need to wait for the job to run at the scheduled time; after the job is executed, you can review the logs in the Cloud Run console.
Creating a Scheduled .NET Job with Cloud Run Services
Even though Cloud Run services are more commonly used to run long-running applications and web services, they can also be used to run scheduled jobs.
Like in the previous section, we will create a sample .NET application that logs the current time when it is run, and we will schedule it to run every hour on GCP using Cloud Run services and Cloud Scheduler.
Creating a .NET Web Application
Because the application will be deployed as a Cloud Run service, it needs to be a web application that listens for HTTP requests. For this reason, we will create a simple web app, using ASP.NET minimal APIs.
To create a new web application, open a terminal and run the following command (replace the [PROJECT_NAME] placeholder with the name of your project):
dotnet new web -o [PROJECT_NAME]Navigate to the newly created directory:
cd [PROJECT_NAME]Replace the contents of Program.cs with the following code:
var builder = WebApplication.CreateBuilder(args);
builder.Services.AddLogging(); // Add logging support
var app = builder.Build();

app.MapPost("/", (ILogger<Program> logger) =>
{
    // Log information
    logger.LogInformation("Job executed at {time}", DateTimeOffset.UtcNow);

    // Return a status code 200 response
    return Results.Ok();
});

var port = Environment.GetEnvironmentVariable("PORT") ?? "8080";
app.Run($"http://0.0.0.0:{port}"); // Start and listen on the port defined by the PORT environment variable
The last two lines configure the application to listen on the port defined by the PORT environment variable. This is required to run the application on Cloud Run.
To test the application, run the following command:
dotnet runIn a separate terminal, run the following command to send a request to the application:
curl -X POST http://localhost:8080In the first terminal, you should see a log message similar to the following:
info: Program[0]
      Job executed at 11/11/2023 14:14:11
Building the Container Image
The process of building and pushing the container image is the same as in the previous section. First, create an artifact registry repository to store the container image (replacing the [REPOSITORY_NAME] and [REGION] placeholders with the desired values):
gcloud artifacts repositories create [REPOSITORY_NAME] \
    --repository-format=docker \
    --location=[REGION]
Enable the required APIs if prompted.
Then, submit the build using the following command (again replacing the placeholders with your values; [PROJECT_ID] is the ID of your GCP project):
gcloud builds submit --pack \
    image=[REGION]-docker.pkg.dev/[PROJECT_ID]/[REPOSITORY_NAME]/[IMAGE_NAME]
This command will build the container image and push it to the specified repository in Artifact Registry.
Deploying the Container Image to Cloud Run Services
To deploy the container image and create a new Cloud Run service, use the following command (replacing the placeholders with your values):
gcloud run deploy [SERVICE_NAME] \
    --region=[REGION] \
    --image=[REGION]-docker.pkg.dev/[PROJECT_ID]/[REPOSITORY_NAME]/[IMAGE_NAME] \
    --platform managed \
    --no-allow-unauthenticated
Note: you can choose to assign a specific service account to the service to restrict its permissions.
Notice the —no-allow-unauthenticated argument: this configures the Cloud Run service to accept requests sent only by authenticated callers, which need to have the required permissions (roles/run.invoker).
After a couple of minutes, the service will be deployed and ready to accept requests.
Scheduling the Job with Cloud Scheduler
To schedule the Cloud Run service you need to configure a Cloud Scheduler job. The process is the same as in the previous section, with the only difference being that the HTTP request needs to be sent directly to the service’s URL.
Because the Cloud Run service is configured to accept requests only from authenticated callers, you need to create a service account and assign the Cloud Run Invoker role to it.
To create a service account, run the following command:
gcloud iam service-accounts create [SERVICE_ACCOUNT_ID] \
    --display-name "[DISPLAY_NAME]"
Add the Cloud Run Invoker role to the service account:
gcloud run services add-iam-policy-binding [SERVICE_NAME] \
    --region [REGION] \
    --member "serviceAccount:[SERVICE_ACCOUNT_ID]@[PROJECT_ID].iam.gserviceaccount.com" \
    --role "roles/run.invoker"
Finally, create a Cloud Scheduler job that invokes the Cloud Run at the desired schedule. Run the following command to create the job (replacing the placeholders with your values):
gcloud scheduler jobs create http [SCHEDULED_JOB_NAME] \
    --location [REGION] \
    --schedule "[SCHEDULE]" \
    --uri "[SERVICE_URL]" \
    --http-method POST \
    --oidc-service-account-email [SERVICE_ACCOUNT_ID]@[PROJECT_ID].iam.gserviceaccount.com
The [SERVICE_URL] placeholder should be replaced with the URL of the Cloud Run service. You can find the URL in the Cloud Run console.
The [SCHEDULE] placeholder should be replaced with the desired schedule, expressed in cron format. For instance, to schedule the job to run every hour set the schedule to 0 * * * *.
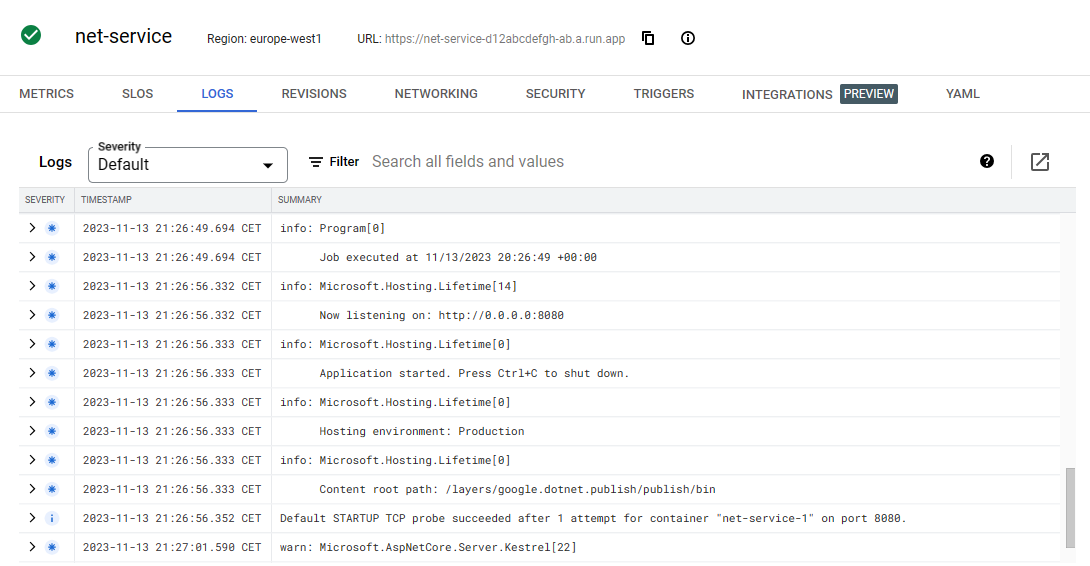
This concludes the setup of the scheduled .NET job on GCP using Cloud Run services. Now you only need to wait for the job to run at the scheduled time; after the job is executed, you can review the logs in the Cloud Run console.
Conclusion
In this blog post, we explored how to create a scheduled .NET job on GCP using Cloud Run. We discussed two different approaches: using Cloud Run services and Cloud Run jobs, and highlighted the key differences between these two offerings. We also walked through a practical example of creating a .NET application, deploying it to Cloud Run, and scheduling it with Cloud Scheduler.
Whether you choose to use Cloud Run services or jobs depends on your specific use case. Cloud Run services are ideal for long-running applications that serve HTTP requests, while Cloud Run jobs are better suited for tasks that run to completion. By understanding these differences, you can choose the best approach for your applications on GCP.
I hope you found this blog post helpful. If you have any questions, feel free to contact me!
References
- What is Cloud Run | Cloud Run Documentation | Google Cloud
- Create jobs | Cloud Run Documentation | Google Cloud
- Getting started with Cloud Run jobs | Google Codelabs
- Cloud Run jobs | Google Codelabs
- Quickstart: Deploy a .NET service to Cloud Run | Cloud Run
- Get started with .NET | Google Cloud
- Cloud Scheduler | Google Cloud
- Create and configure cron jobs | Cloud Scheduler Documentation | Google